mTLS
Overview
In this post, we will deploy mTLS by using Caddy as reverse proxy to force client authentication before accessing sites, and store the client certificates in hardware via Yubikeys.
TLS is the backbone for securing HTTP traffic and is commonly deployed in a way that authenticates the site only. This is perfectly fine, however sometimes it is useful for the site to also authenticate the user. This is known as “mTLS” or “Mutual TLS”.
You can read more about it here, however the jist of it is that there is an additional step in the TLS handshake in which the client presents a certificate which is verified by the server before the session is allowed to be setup.
Uses
Since both parties are authenticated, it can be used to establish bilateral trust in which the client trusts the server, and the server trusts (or authenticates) the client. Authentication is based on strong cryptography (instead of passwords), therefore providing robust security.
A strong advantage of mTLS is it is “simple” and takes place before any application-specific logic is run. Vulnerabilities in the web app realistically can’t be exploited until after the client is authenticated, providing substantial security.
Drawbacks
Certificate management (issuing, revoking, installing, etc…) tends to be challenging. Setting up mTLS is more complicated than providing usernames and passwords.
Stolen certificates are a substantial danger, and we will mitigate this by using a Yubikey below.
Generating Certificates
Yubikeys have a PIV mode which stores and generates the certificates in hardware. The private keys do not leave the device which provides us with strong security.
Yubikey Setup
Check that PIV mode is “Enabled”. If not, you’ll need to enable it.
$ ykman info
Device type: YubiKey 4
Firmware version: 4.3.7
Enabled USB interfaces: OTP, FIDO, CCID

Applications
Yubico OTP  	Enabled
...
PIV         	Enabled
Note: if you see WARNING: PC/SC not available. Smart card (CCID) protocols will not function., start the pcscd service on your device which allows communication with the smart card.
Next, you should change the PIN and PUK (PIN unlock key) on the device. This PIN is required to “unlock” the device at which point the certificates can be used. Should someone steal your Yubikey, the PIN is what protects your private key from being used (it still can’t be copied off).
$ ykman piv access change-pin --pin 123456 --new-pin <new PIN>
$ ykman piv access change-puk --puk 12345678 --new-puk <new PUK>
Certificate Authority Setup
Next, we need to create a certificate authority. This is necessary because Caddy needs to know what client certificates are valid by checking if they are signed by the CA it is instructed to trust. We will sign the Yubikey client keys with this CA.
IMPORTANT: Carefully consider that anyone with this CA private key can sign any key, and it will be valid for client authentication! Guard it carefully! The PEM pass phrase will be used to encrypt the private key for storage.
$ openssl genpkey -algorithm ed25519 -out ca-key.pem -aes256
$ openssl req -new -x509 -days 3650 -key ca-key.pem -out ca-cert.pem
Generate Client Key
With the CA set up, let’s generate the client certificate in hardware on the Yubikey. Slot “9A” is used to store authentication keys.
My Yubikey and firmware version only supports up to ECC-384 keys, however if yours allows X25519, use that instead.
$ ykman piv keys generate --algorithm ECCP384 9a pubkey.pem
Enter a management key [blank to use default key]:
Private key generated in slot 9A (AUTHENTICATION), public key written to pubkey.pem.
Generate a CSR, keeping the private key on the Yubikey:
$ ykman piv certificates request --subject "CN=alice" 9a pubkey.pem user.csr
Enter PIN:
CSR for slot 9A (AUTHENTICATION) written to user.csr.
Sign the CSR with the CA and generate a valid certificate for the user:
$ openssl x509 -days 3650 -req -in user.csr -CA ca-cert.pem -CAkey ca-key.pem -out user-cert.pem -CAcreateserial
Certificate request self-signature ok
subject=CN=alice
Enter pass phrase for ca-key.pem:
Finally, load this certificate onto the Yubikey:
$ ykman piv certificates import 9a user-cert.pem
Enter a management key [blank to use default key]:
Certificate imported into slot AUTHENTICATION
We can inspect the certificate and make sure it’s also valid:
$ ykman piv certificates export 9a - | openssl x509 -text -noout
Certificate:
    Data:
        Version: 3 (0x2)
        Serial Number:
            45:26:4b:32:89:67:47:a4:c0:c4:d4:c4:55:ab:99:ed:58:34:93:45
        Signature Algorithm: ED25519
        Issuer: C=US, ST=IL, L=Chicago, O=Internet Widgits Pty Ltd
        Validity
            Not Before: Nov 17 20:31:25 2024 GMT
            Not After : Nov 15 20:31:25 2034 GMT
        Subject: CN=alice
        Subject Public Key Info:
            Public Key Algorithm: id-ecPublicKey
                Public-Key: (384 bit)
                pub:
                    04:72:76:7c:40:93:6e:27:80:28:34:4a:be:89:30:
                    28:a0:8e:45:82:34:0f:c7:1c:94:fe:d8:5d:21:fa:
                    a1:6f:79:24:6f:52:00:22:b6:d3:ee:cc:c0:af:2f:
                    ae:2c:49:4b:15:8b:65:1d:14:e6:ed:73:2a:5a:59:
                    b9:e3:11:2c:87:f4:36:7d:37:08:c2:8c:49:9c:9f:
                    21:e5:d0:55:3c:5d:a3:2b:fc:4e:f2:61:fc:e3:b4:
                    ee:cf:b2:47:5a:a7:20
                ASN1 OID: secp384r1
                NIST CURVE: P-384
        X509v3 extensions:
            X509v3 Subject Key Identifier:
                82:2C:88:1C:D6:1E:43:19:B7:D2:9C:D8:DC:00:FB:2B:F8:C8:07:15
            X509v3 Authority Key Identifier:
                F8:D7:EB:D1:20:6C:73:96:B1:0B:7F:7F:70:C5:AC:31:0F:72:42:8D
    Signature Algorithm: ED25519
    Signature Value:
        5d:62:f3:9c:12:34:f9:86:ac:a1:67:ad:32:9a:17:fe:84:0e:
        a5:31:16:b4:f2:42:c4:11:07:75:91:d6:18:ff:f5:8d:bd:d1:
        9c:be:fc:02:a1:b5:01:8f:a8:9c:2c:a3:18:d0:5c:ba:5f:44:
        c4:23:24:53:11:24:f2:de:20:04
$ ykman piv certificates export 9a - | openssl verify -CAfile ca-cert.pem
stdin: OK
Setting Up Caddy
Phew, the certificates are out of the way, now let’s setup Caddy as a reverse proxy to protect our sites.
Below is a Caddyfile which uses ca-cert.pem as the CA certificate (public key) to validate all mTLS authentication by clients. It then sets up a reverse-proxy for mysite.com and proxies it to 10.0.0.1:8000.
Note: be sure to firewall or block all connections on 10.0.0.1 that are not from the reverse proxy, otherwise a user can connect directly and bypass client authentication!
(mtls) {
        tls {
                client_auth {
                        mode require_and_verify
                        trusted_ca_cert_file ./ca-cert.pem
                }
        }
}
mysite.com {
	import mtls
	reverse_proxy 10.0.0.1:8000
}
Testing
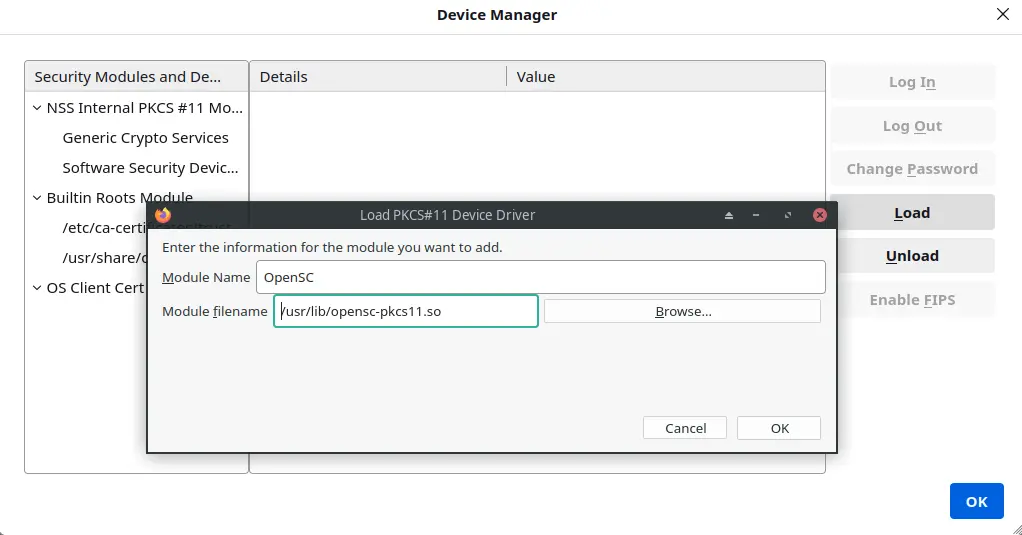
You must load the smart card from your browser to use its certificates. In Firefox, navigate to Settings -> Privacy & Security -> Security Devices -> Load.
Insert the path to the OpenSC PKCS11 module for your machine (you might need to install OpenSC first):
Afterwards the Yubikey should appear:
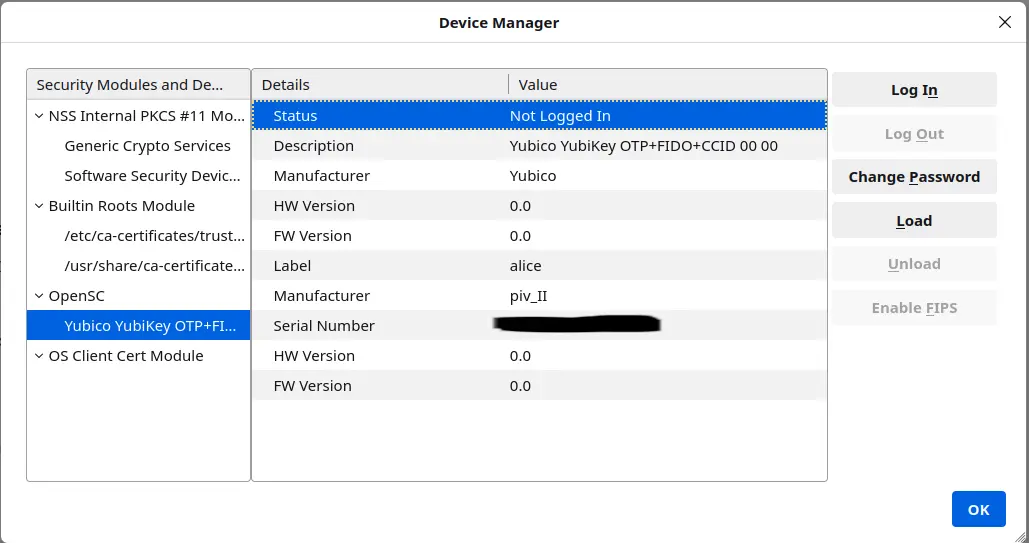
Press “Log In” and enter your PIN to unlock the smart card.
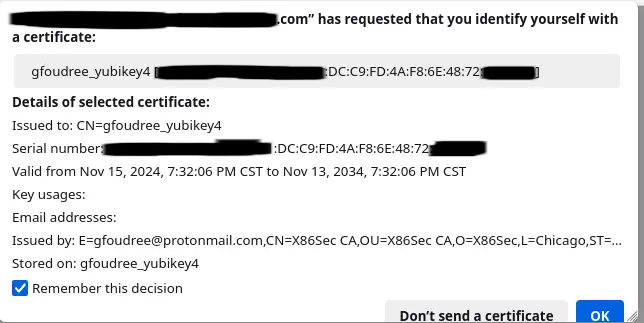
Finally, load the site and voila you are prompted for the certificate on your Yubikey and are successfully authenticated!